If you’re a church that would like to be able to expand your A/V department and run EasyWorship on 2 computers simultaneously, but you aren’t able to have different operators for each computer, using MIDI is a great way to control both computers at the same time with one operator. For instance, you run one computer for your in-house projection and a second computer for your live stream, you can use an iPad with a MIDI controller app to run both instances of EasyWorship at the same time.
MIDI is only available as a feature in EasyWorship if you currently subscribe monthly or annually. It will not be available if you own the one time purchase license.
I will walk you through how to get the iPad connected to each computer and how to set up the MIDI controller. To do all of this, there are a couple of utilities that will need to be installed on each computer. One is Bonjour and the other is rtpMIDI. Use the links to see the instructions for downloading and installing them. These utilities allow the computer to ‘talk’ to the mobile device over the Wi-Fi network. Once those are installed, you can connect the computer to the mobile device.
Setting up Bonjour Print Services
Bonjour doesn’t require any setup, it just needs to be installed. Even though it is called Print Services, this utility lets you discover and configure Bonjour-enabled printers and other devices (iPad) from your Windows computer.
Setting up rtpMIDI
Note: You will need to follow this process on both computers that are running EasyWorship.
1. Open rtpMIDI on the computer.
2. Click the Plus button under the ‘My Sessions’ box in the top left.
(You will see your computer name show up in the box)

3. Check the box next to your computer name.
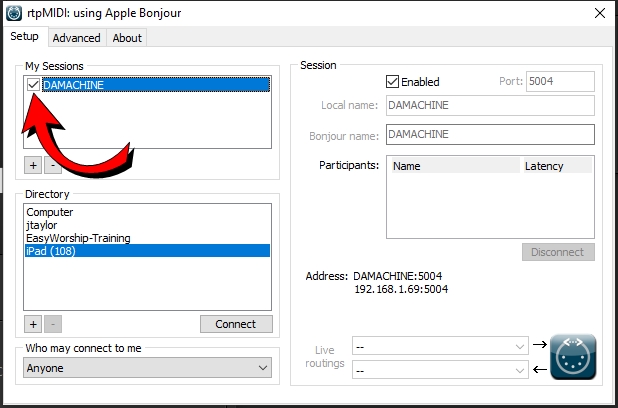
4. Select your mobile device in the ‘Directory’ box in the bottom left.
5. Click Connect.
(You will see your device show up in the ‘Participants’ box on the right.)

6. Close rtpMIDI.
Installing MIDI Controller app (iPad)
There are a few MIDI controller apps available. The one we have tested and will show here is called MidiPad and can be downloaded from the App Store.
1. Open the MIDI controller on your mobile device.
2. Go to the settings.
(In MidiPad, click Edit in the top right corner)
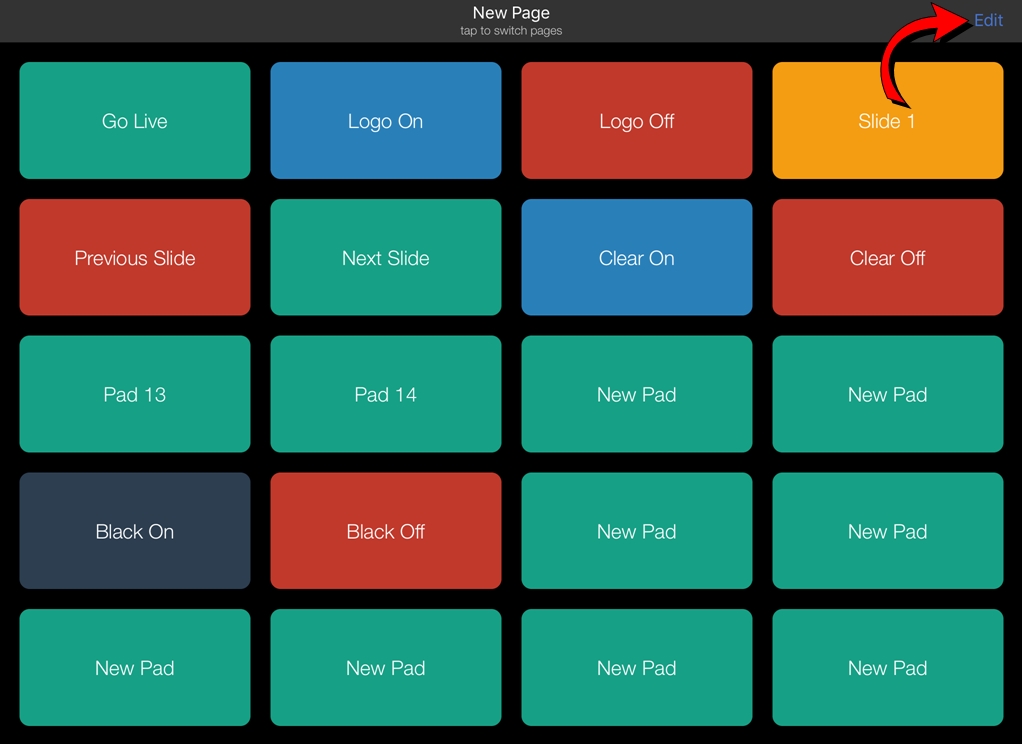
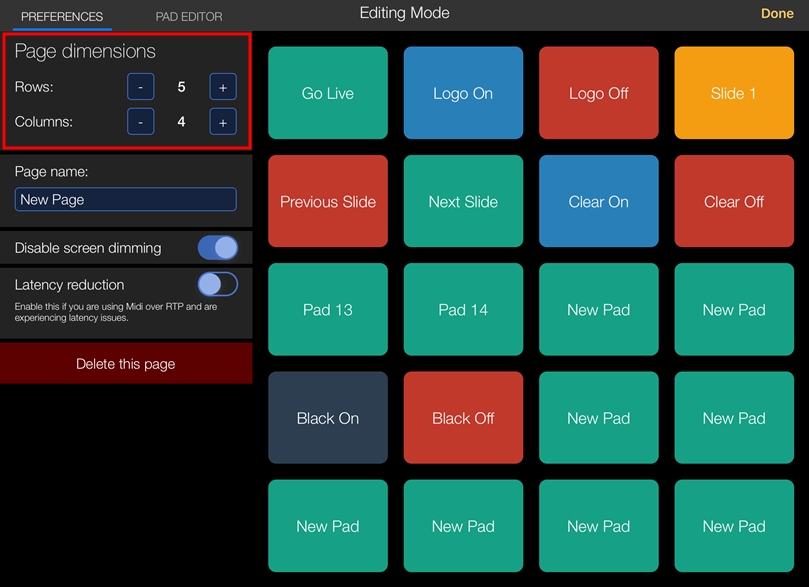
3. Select how many pads or rows and columns you want and name your pads.
4. Exit the MIDI controller settings.
Training the MIDI cues with EasyWorship
Note: Perform these steps on both computers where you’re wanting to control EasyWorship
1. Open EasyWorship on the computer.
2. Click the Remote button on the toolbar.
3. Hover over MIDI.
4. Click the Plus button in the bottom left corner of that popout window.

5. Give it a control name and choose your Input MIDI Device and MIDI Channel.
(The input MIDI device will be the computer name of the computer you’re on since it will be the one receiving the MIDI cues)

6. Click on the Input Cues tab.
7. Click in the box of the function you want to train. (ex. Logo On)
8. Click on Train MIDI Cues.
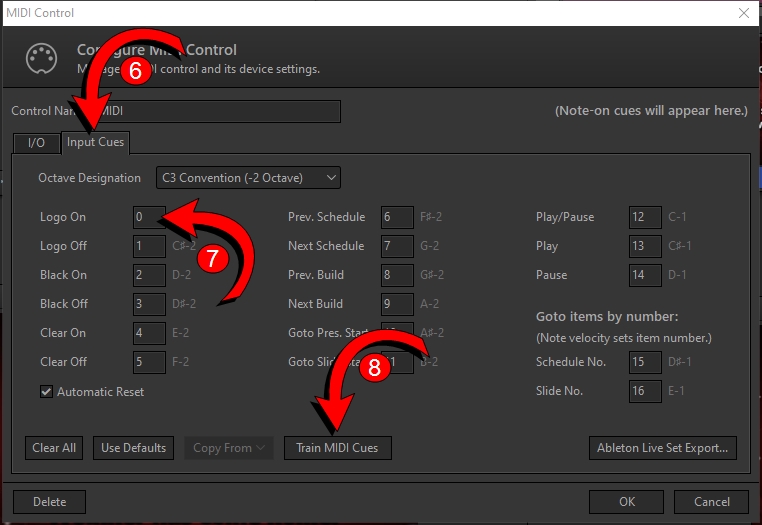
9. On your mobile device, press the pad/button that you want to use to perform that function.
(You will see the new note number shown in EasyWorship for that pad/button)
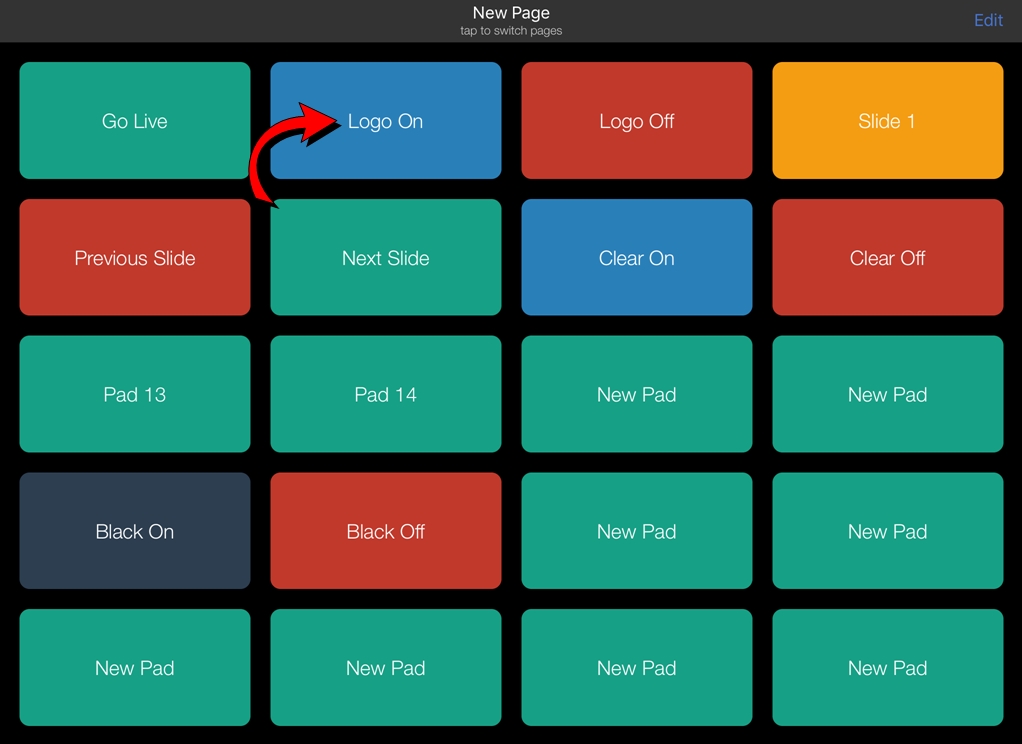
10. Continue training all the cues you want to use like Logo on and off, Clear on and off, Black on and off, Goto Presentation start, Previous Schedule, Next Schedule, Previous Build (slide), Next Build (slide) and so on by selecting the box next to that cue in EasyWorship and then pressing the button in MIDIpad on your iPad.
(You only need to click the Train MIDI Cues one time. After pressing it, just click in the box next to the function you want to train and press the pad/button on the app to train it, repeat till done)
11. Click OK when finished.
Controlling EasyWorship
1. Click the Remote button on the toolbar in EasyWorship.
2. Hover over MIDI.
3. Click the Lock Icon to unlock it.
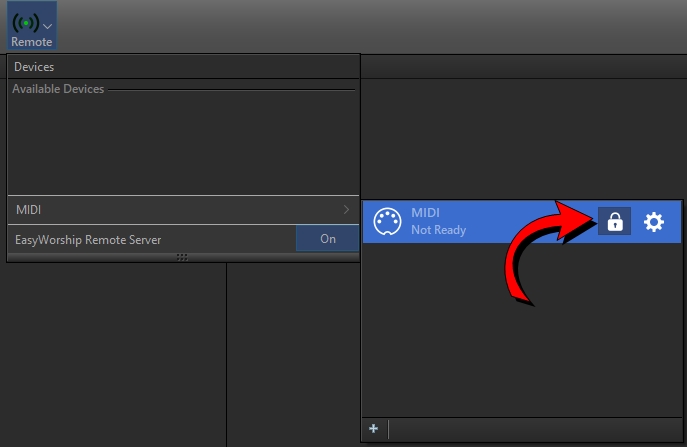
(You will see a phone icon with the word “Ready”.)
4. The iPad is now able to control the EasyWorship schedule.

Create your schedule in EasyWorship and open it on both computers. When you press a pad/button on the MIDIPad app on your iPad, it will send the MIDI cue to both computers simultaneously to perform that function.
Go Live with the next scheduled item:
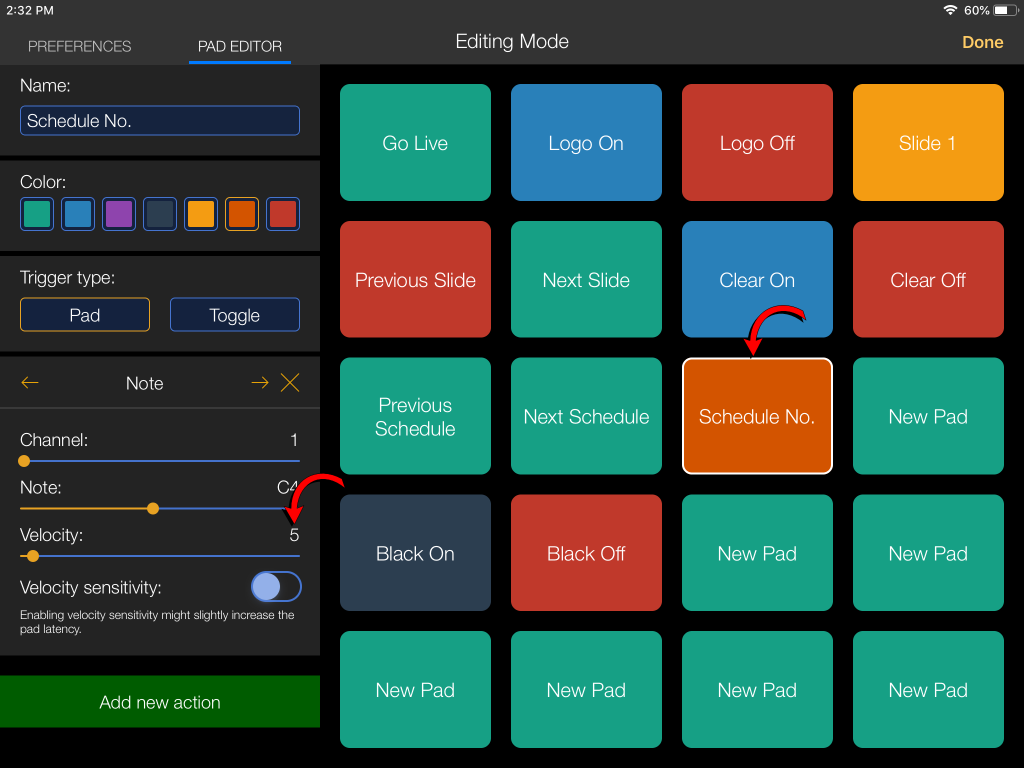
When going live to another scheduled item using MIDI, it requires 2 functions. You have to select the scheduled item you want to send live and then Go Live to that item. There are a couple of different ways to do this. You can use Next Schedule or Previous Schedule MIDI cue to select either the next or previous scheduled item, or you can use Schedule No. and use Velocity to determine the schedule item number. For example, if you wanted to select the 5th scheduled item, you would use the Schedule No. MIDI cue and set the Velocity to 5.
Velocity:
Each cue has 3 different properties assigned to it; the channel, the note, and the velocity. The channel and note will be set to the same setting you have set in EasyWorship when training the MIDI cues. The velocity can be changed in the cue itself to determine which slide or schedule item you want it to refer to. In the case above and the image below, you see I have set the Schedule No. cue to the velocity of 5 for the 5th scheduled item.
Sending either of the above MIDI cues, you will not see anything happen. All it is doing is selecting the schedule item. You will then need to send it live by sending one of the following MIDI cues:
To send the selected EasyWorship scheduled item live, you can use either Goto Pres. Start, which will send it live to the first slide of that item, or you can use Slide No. and set the Velocity of the cue to the slide number you want to go live to. For example, if you want to go live to the first slide, set the Velocity to 1. If you want to go live to the third slide in that item, set the Velocity to 3.
To summarize, you have to have 2 functions to Go Live to a new scheduled item by pressing 2 buttons on the iPad. You need to select the item by pressing either Next or Previous Schedule or press the Schedule No. button, AND you have to tell it to Go Live by pressing the Goto Pres. Start or Slide No. button.
Example:
If I’m going to Go Live to the next Scheduled Item, in MIDIpad on the iPad I will press:
1. Next Schedule
2. Goto Pres. Start
If I want to go directly to schedule item number 6, even if it isn’t the next one, and I want to go to slide number 3 first, I will press:
1. Schedule No. (with Velocity set to the schedule item number. In this case, 6)
2. Slide No. (with Velocity set to the slide number. In this case, 3)
MIDI is a great feature, not only for controlling two computers at one time, but also can be used to automate the slides in EasyWorship using a DAW like Ableton, Prime from Loop Community, or Playback from Multitracks.